MG-Rover.org Forums banner

Your Mission MGJohn, should you wish to accept it

15K views 66 replies 17 participants last post by  MGJohn  
#1 ·
Is to sort this non-runner MG ZT 1.8t with suspected cylinder head gasket damage. I accepted ... for me a step into the unknown as I had not heard the car's engine running let alone driven the car!

Anyway as previously posted, got the engine running after fitting the Orange Clip to the realigned parts of the Fuel Filter which had become separated. Frequent problem with this BMW design in-tank Fuel Filter. Not a job I'd like to do again soon but, that Orange Clip is a permanent fix. This is the car and made a good start in the fine weather over the past two days. :~


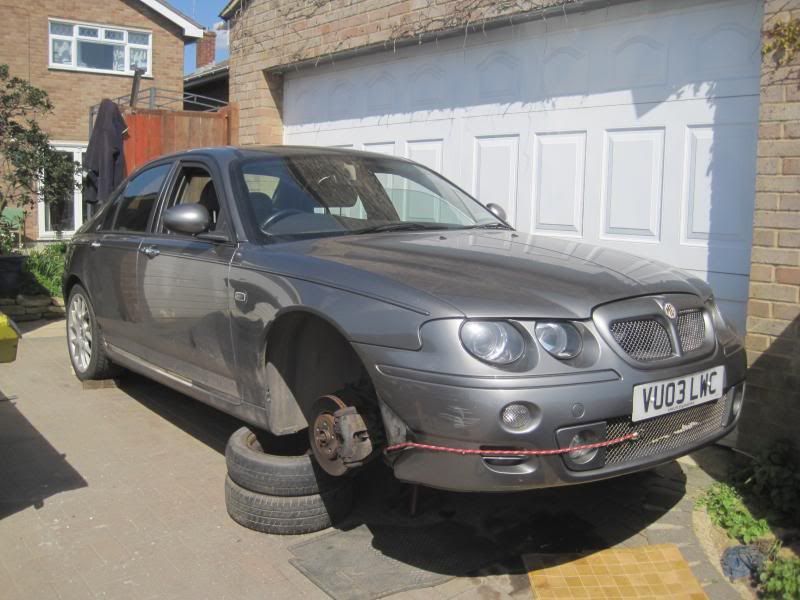
The car is not actually resting on those two steel wheels and tyres. It's on axle stands and chocked. The wheels are there as a failsafe should the axle stands and chocks decide to let go. Better double safe than sorry as I will be working under that car at times.

I got the Cylinder Head off ~ bit of a struggle with severely corroded Exhaust Manifold Studs and Nuts. A completely corrosion seized Ex-Manifold Flange to Turbocharger 13mm Flanged Nut had been completely rounded in previous ownership. Needed an angle grinder to break it up. Here is what was revealed :~


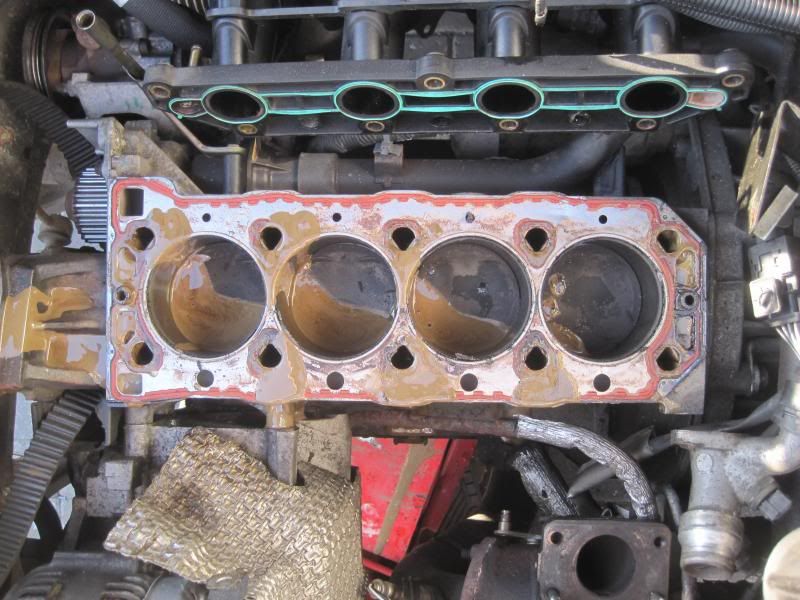
There is much more work removing the Cylinder Head on these Turbocharger versions compared to the normally aspirated engines. Lots of additional gubbins in the way to slow progress. Most need to be removed to access other parts essential to remove for the job. Learned a lot today.

Pleased to observe very little signs of Fire Ring Indentation on Cylinder head Face. Just witness marks. That's good :~


When removing the Oil Filler Cap to do the usual initial check, not much evidence to be seen of cylinder head gasket damage allowing oil-coolant to mix. Until ... Boy of boy did they mix on this engine. Click on image :~


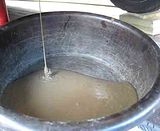
Beware, that bowl I used would normally be ample to collect the whole drained oil contents from any K-Series sump. I had not allowed for the coolant mixed in with the oil which increased the volumeby some margin. My son alerted me just as the bowl was staring to overflow and still stuff coming out. I'm allowing it to drain overnight. Then when engine is all back together, I will buy some Diesel Fuel ( Not actual Diesel Engine Oil ~ Diesel Fuel ) and run that in the engine briefly as it will act like a flushing agent. The inside of that engine and all the coolant passageways will need a couple of flushes once I'm happy the engine is returned to good health. Then dump the Diesel Fuel from the sump and return to recommended 10-40 semi synthetic.

Ongoing ...
 
#3 · (Edited)
Hi John!

I love the way you work and that you share your experience with us :)
I know you know what you are doing and I don`t have much advice to offer you, just keep up the good work :)

I helped out a friend last winter with a similar work on a MG-ZT. Here is how we did it: http://www.the75andztclub.co.uk/forum/showthread.php?t=137958

P.S.

Check and make sure that the radiator fan works on both speeds after the repair. Its not unknown that these fails when getting up on age :)

P.S.2
..And the last tip... If the car has a PRT thermostat fitted, check that there is a blanking plate and not a thermostat fitted to the thermostat housing at the backside of the engine :)
 
#4 ·
Good news and good progress today.

Thanks for the encouragement.

This project car is becoming much less of an unknown quantity for me now after the second serious day working on the car. Pleasing so far. Mainly good news to report.

Firstly, before cleaning up the cylinder block and cylinder head, first thing I did after removing the very poorly Cylinder Head Gasket was to give all four Cylinder Liners my "finger test" ... :)

This involves running my finger nail across the liner block interface. Checking each of the four Cylinder Liners at four points around the top of their circumference it where it aligns with the cylinder block. I could thus detect sixteen points of the four liners a tad proud of the block. That's good news. Cleaning up the whole top surface of the block later by lightly running a wire brush in an electric drill over it, I noticed that areas close to the liner block interfaces there was a very thin line of stain left close to the interface which is further confirmation that the Liners are proud of the surrounding block. I noticed this soon after the wire brush treatment although the wire brush has remived most of it. This first image clearly shows that and the second one the fully cleaned up Cylinder Block.


There was very minimal Fire Ring Indentation near any of the "Hot areas" near the Exhaust Valves. No need for a Cylinder Head Face Skim. Because of this and the Cylinder Liners showing proud, I will use the MLS and the Head Saver Shim. Here's the cleaned up Cylinder Head :~


This next image shows the Head from the Exhaust side. Now here's the little bit of bad news. Note the remnants of a sheered off Exhaust Manifold Stud towards the topo left side. Snapped off in previous ownership ... :( That has a few threads. I will grind down two nuts and try to lock them on those threads and try to extract the broken off stub of the stud... If that fails, I'll take the Head to my man with a BIG shed in his garden to get it removed and a Helicoil fitted if necessary. I have a set of Allen Key drive Exhaust Manifold Studs ready to fit in the head. I prefer these and most of the family Rovers and MGs have these now.


Using my trusty straight edge, with the strong sun now low in the sky behind it. the Face of the Cylinder Head appears true in all directions.


Always learn something new when working on these old cars and today was no exception. It appears that the coolant into the oil was strictly one way traffic. No sign of oil in the Cooling System. Not come across this before. Usually when a Cylinder Head Gasket is damaged, oil and collant mix everywhere. Looking at the very poorly OE Cylinder Head Gasket, the damaged areas confirm only those seals around the Oil Drain Holes had been damaged. Every one of the Ten Through Bolts were loaded with oil-coolant emulsification mix. They all cleaned up well using some Petrol ~ RON's 95 finest ... ;)

Finally, previously I mentioned leaving the sump to drain overnight. It was fully drained this morning. Putting all the drained oil-coolant mix from the sump into a large bucket, a glance shows maybe as much as double the oil usually drained from from a healthy engine. So that's where all the coolant was going. ... :rolleyes:

The new Water Pump arrived this morning. I believe the one on the car is the original even though it looks new. It has the Evaporator. I can detect a very slight amount of play in the Water Pump shaft so I will replace it with the new one.

Beginning to like the way this car is shaping up.

Finally my son and I invested ÂŁ60 ( ÂŁ30 each ~ good old ebay ) in a Nilfisk Power Washer. Refurbished at that price but, it looks like a new one and works very well. Far better than other Power Washers we've used which give up after a year or so of light amateur use. The Builder working on our house extension has a well used (* battered in fact ) one which we used a few times and were impressed with it. So we got one. I used it to clean around and under the engine as with so many parts removed, access now is excellent.

Ongoing.
 
#5 ·
busy day then

busy day then :) If your handy with a welder you may be able to weld something on the the broken stud ,, but saying that even drilling it while its off the car using a pillar drill would be easier than whilst in the car
 
#7 ·
Having driven one before, it's no match for the 620ti's understated get up and go ~ by about a whole 40ps. More a fast comfortable wafter than a rapid accelerator. In the past, I have shall we say, "Matched Strides" with a Rover 75 V8 ... the 620ti just edged it. Much to the surprise of both its driver and me ... ;) Lots more useful goodies though. Doubt I'll use them all. Also a 6CD autochanger same as in my other Rovers so conveniently just swap the loaded CD cassettes around. Nice drive though with built in SatNav and the small screen will be useful. All appear to work. Bum warmer seats too... which I did not think I'd ever appreciate having ... until I used some that cold winter a few years back ... that's old age for you ... :) I like the K-Series engine in all its forms. This Turbocharged version will be my first experience of that spec K-Series which I always would have liked in the MG ZS.

Even today, few ordinary production cars match the low profile overall competence appeal of the Rover 620ti for me. Not bad for a car now over twenty years since they first appeared. Does a lot more than it says on the tin. Look at the time. Must get some sleep .. ;)

Speaking of the K-Series engines, to my less experienced eyes, the Cylinder Head on this Turbocharged car looks identical to those on say a Rover 1.4 25 or 1.8 Rover 45. Valve sizes and other features all look the same. If there are differences such as CAM profiles on the Camshafts they are hard to spot. I suspect the Cylinder Heads are identical otherwise.

P.S. I did notice the PRT Thermostat housing when working under the car. Looks like the ones fitted to some Rover Diesels IIRC.
 
#8 · (Edited)
Hi John,

Great work!

It can be discussed widely about liner heigths for what is correct or not. All the K`s I have measured have had even liner heigths between 0.000" to 0.002". No one above. Seems to me that this is the "factory" stand off. I think that the nail/finger test should be more than sufficient as you will easily feel if the liners are above or below the block deck. As long as they all are above, I think you will be good :)

Earlier experience, serious advice and your "gut feeling" will in many ways decide which head gasket solution you want to go for. There are several options with their different good properties. Regardless of what solution you go for, choose a known quality brand, preferably Payen. Keep away from the "no-names" found on ebay are my hard learned experience :)
I guess the head saver shim you refer to above is the one supplied with the MLS gasket kit?

Regarding the cylinder head, your observation is correct. Its the same for all the K-engine range, the only difference is the tapped holes for the timing belt tensioner. One type for manual tensioner and one type for auto tensioner. I guess the cams may also differ, but these is easily swappable. I am now running with a cylinder head from a 1.4 Rover 25 on my newly rebuilt 1.8 engine in my R75.

Keep up the good work, looking forward to your next update :)
 
#9 ·
Did not touch the car today but did take this lot that I drained from the car's sump overnight to the local council waste disposal site. The waste engine oil facility was being pumped out into a tanker for recycling. There must be close on ten litres there, half of it coolant. No oil in cooling system though. Very glad about that based on similar 1.8 K-Series experience I worked on three years ago :~


Tried locking two nuts on that sheered exhaust manifold stud. Nothing doing. I'll get someone to weld a nut onto the stub after the Easter Holiday period. I'll probably remove the Turbocharger in order to better access that seized Turbo-Exhaust Manifold stud now much cut about during the process of cutting off its badly seized corroded nut complete with totally rounded flats. It's annoying little jobs like these which slow operations down to a standstill.

I plan to use the car next month so still have two weeks to play with.

I have a good spare 1.8t Turbocharger and Exhaust Manifold on standby. May fit those before the end of the month when I shall tax the car and start using it. The car came with eleven months MoT and the previous owner spent ÂŁ350 to get it through the test back in February according to the paperwork with the car. Tyres, new brake discs and pads etc.
 
#11 ·
Turbocharger is fine as far as I can tell. According to the previous owner, as soon as he realised or was advised that the cylinder head gasket needed replacement, he drove the car half a mile home and parked it up. I see no reason to doubt that. When I bid on this car I did so knowing I had a good Turbocharger as back up.

I had another 1.8 K-Series ( 45 Connoisseur ) and a 1.4 ( 25 ~ a friend's which they had for about eight years ) both with a very bad case of oil-coolant mix which was far worse than this one. Both engines and whole cooling system loaded with thick oil-coolant mix which took an age to clear out. Three and five years on respectively, both cars now run superbly and with stable and crystal clear coolant levels.

I plan to get this ready to use in time to tax it as from 1st May. Even though the Water Pump looks fairly new, for the sake of eighteen quid posted, I'm fitting a new one along with new MG-R Timing Belt even those the car's one looks fine. The water pump and the two new Polyvee Drive Belts arrived recently. Far easier to do these renewal jobs with the Cylinder Head not present.

Although opinions on this are divided, based on my own direct experience, I will use the MLS ( Multi-Layer-Steel ) and head saver shim.
 
#12 ·
Fitted new Water Pump and removed Turbocharger today.

Made a productive executive decision and more good progress today.... ;)

In addition to the planned fitting of the new Water Pump, I decided to remove the original Turbocharger and fit a good replacement spare I have. That will allow me to have the mangled Manifold-to-Turbocharger stud removed. Would be very difficult to do that with the unit still on the car.

The first picture shows the old Water Pump still in place when checking for any tell tale signs of coolant stains indicating a worn or wearing pump. There were none in fact the whole area was relatively clean considering the car is past its eleventh birthday.

Second picture shows the old Pump now removed. It has the Evaporator.

Third picture shows a close up of the old Pump. The vent in the body of the pump is just visible. That's where the coolant escapes when the Pump starts to wear.

Fourth picture shows the cleaned up Water Pump housing. Fifth picture the contents of the new Water Pump kit. The sixth and seventh shows it fitted.

The next two images are of the replacement Turbocharger and the old one alongside the new. Finally, I placed an old bowl under the area when disconnecting the coolant hose from the Turbocharger. Again very pleased to see no evidence of engine oil present in little amount of drained coolant which escaped when the hose was disconnected. Crystal clear as was the coolant behind the old Water Pump when I removed that.

I also checked the original Thermostat housing fore most K-Series engines. It was empty ... ;)

I have replaced the Turbocharger on several T-Series cars. Quite a lot of work and time involved making a proper job of that even for the professional with access to better kit and the advantages of a pro-workshop. A turbocharger swap on this K-Series car is a lot more work. It will be a tad easier if I ever do it again as I learned much from the job today which would save more time and work next time. The main thing that slows amateur me down is the location and orientation of many of the nuts, bolts and other fasteners oin the multiplicity of components. They are located to facilitate the production lines and assembly. This often means that when all the components are on the car, many are well out of reach, inaccessible or simply facing the wrong way for the hand tools let alone power tools. All the worm drive "Jubilee" style clips which fasten all the coolant and turbocharger hoses had the worm drives in poorly accessible locations. When I put them all back with the replacement turbocharger, I will arrange each one so that anyone working on this car in future will have far easier access to them all for the tools.

Finally you may remember my mentioning on another thread here my son's friend broke his shin bone on the last day of their Snowboarding Holiday. He drove round in his 4be4 this evening just as I was starting to pack up. He was limping slightly. Apparently the fracture was rather worse than initial indications. On arrival back home, the plaster cast was removed and he had a major operation at Gloucester Royal to insert a shaft screwed into the broken bone. Not nice for the lad.

Be careful out there.
 

Attachments

#13 ·
Didn't touch this car today but, as the pressure washer ( Nilfisk ) was up and running, I washed the turbocharger removed from the car last evening.

Had one of those now rare senior moments .. ;) ... an :idea:

Rather than wait until after the Holiday break to get the Nut welded onto the broken Exhaust Manifold Stud so that it can be removed, I'm going to use the Cylinder Head from the spare 1.8 Rover 75 engine I bought a couple of years ago. Wont take long to remove that from the engine tomorrow. Soon clean it up and fit it. Also the spare turbocharger which has almost no play in the turbine shaft. The car's original turbocharger has some detectable shaft play but not sufficient to need repair.

I can then get the broken and abused studs on the original cylinder head and turbocharger removed at my leisure. All being well, given fair weather, should have the replacement Cylinder Head and Turbocharger on the car tomorrow. Be nice to have the bulk of the work completed tomorrow. That's the plan but with breaks to watch the F1 action in China. Might have a few "Best of the Rest" quid bet on Vettel ~ attractive odds available where some on-line bookies are betting without the two Mercs. That often happens when its obviously the proverbial "Two Horse Race" .... ;)

Looks like shaping up into a productive and enjoyable day.

Ongoing.
 
#15 ·
The cylinder head from this 1.8 "Turbo" looks identical to those I've removed from 1.4 Rover 25s. Valve sizes all look identical. IIRC, the valves on VVC heads appear slightly larger.

Earlier in the thread Bienet1 confirmed what I had observed and suspected that they are identical. Just minor differences with Timing Belt Tensioners locations.
 
#16 ·
Wise move on the turbocharger - that oil will have been all that was lubricating the bearings on the old one. They frequently fail about 100 miles after replacing the headgasket on these. I'd also replace the thermostat whilst it is all in bits - they often go too, frequently opening too early.
 
#18 ·
Thanks for the encouragement folks. I bought this car totally unseen and untried ( non-starter engine and suspect CHG damage ) based only on a very brief description and picture. Description included ÂŁ300 plus spent for MoT one month before the signs of oil-coolant in the filler cap. Plus points being lots of useful goodies and car will still have over nine months MoT when I take it on the road 1st May. Recent new large capacity battery plus I found about ÂŁ2 in loose change under the seats ... :) Oh yes, bit annoying working on that in-tank fuel pump with a 3/4+ filled fuel tank .... Before I rectified the in-tank filter, I thought the fuel gauge showing over 3/4 full was faulty .... it was not. Every little helps ... :)

Yes, took a chance but, worse case scenario if had to break the car would recover most or all my outlay. Meantime that is not the case and the more I've worked on the car, the more I like what I'm seeing. It's a lot better than I first thought.

In between China GP, Touring Cars and a few other things, I'll try get that turbocharger fitted and remove the Cylinder Head from the spare 1.8 engine.

Rain forecast and its a bit chilly, dull and wintery outside. Where did that lovely sunshine of the past few days go? Fair weather boy me ... Must be brave at my age ... ;)

Additional expenditure so far :~

ÂŁ18 for Water Pump delivered.

ÂŁ8 for Used in-tank Fuel Filter complete assembly from scrapyard R75. This included the FOC ( Fabled Orange Clip ) and I had already ordered one for ÂŁ6 delivered. I learned much working on the fuel in-tank filter on the scrap car. The main purpose for my scrapyard visit.

ÂŁ14 for PAS and Alternator Polyvee Drive Belts delivered.

ÂŁ19 for MLS CHG delivered.

ÂŁ3 for MG-R Oil Filter and ÂŁ8 OE Camshaft cover gasket.

I will spend a few more quid on 4-5 litres of Diesel Fuel to use as an engine oil flush to clear out any remaining "Mayo" ( Oil-Coolant mix ) which will be inside the unseen parts of that engine. Also some good quality 10-40 Semi-synthetic after I've drained the flushing Diesel Fuel.

When up and running, I suspect I will really like this car and use it for a year or so as a daily driver to get some benefit return from my work and outlay.
 
#22 ·
Yes, plus it was surprisingly easy which was an unexpected bonus. I expected my trusty old Rover to struggle with a medium sized car. It did not. That's a good 620ti for you. I attached the A-Frame bars to the lower suspension members. In the event, it was one of the easiest towing experiences. As though it was not there which needs lots of attention on the Motorway as the speed can creep up.

What also helped to move the 'dead car' was the presence of a towing 'eye' location behind a small circular removable panel in the front bumper. When I was less than half a mile from home, I removed the A-Frame and inserted the actual towing eye. It was in the boot ~ and got my younger son James to steer it through narrower street access to our house which always has lots of cars and Vans parked nearby restricting clearance.

Spent a few minutes working on the substitute Cylinder Head.

I used two 15mm Nuts locked together on the five Exhaust Manifold Studs and all were relatively easy to remove by that method. I will fit these superior Allen Key driven Studs with their Brass Nuts :~

Allen Key type Ex-Manifold Studs with Brass Nuts

Fitted these and similar to several of the family's cars. That little kit will make fitting the Exhaust Manifold, its new gasket and attaching the Turbocharger so much easier. With the added bonus that should anyone ever need to work on these in the future, they will be able to do so without too much work or any problems.

Although it was relatively clean, I was going to pressure wash the replacement cylinder head but the rain has become steadily heavier and is still pouring.

Tomorrow is another day as they say.

Meantime I'm enjoying the Snooker on BBC.
 
#23 ·
Hardly touched this car again today but, did manage to clean up the spare Cylinder Head and compare it with the original from the car.


Whilst I would not hesitate to use this spare cylinder head on a normally aspirated car, I will refit the original back on the engine once I have had that broken off Exhaust Manifold Stud removed which I hope to do tomorrow. Reason being is that the spare has been skimmed at least once. Otherwise it is fine. When removing it from the spare 1.8 engine, the MLS gasket and head saver shim was more substantial ( thicker ) than any of those MLS ones I've fitted to Rover engines. That includes "Klinger" MLS items as used by Rover at the factory to T-Series Turbos. Possibly a thicker one obtained to make up for the lost clearance after the cylinder head was skimmed. :dunno:

In the sunshine I got the tools ready to fit the replacement turbocharger to the car. Then as I was about to start, a few spots of rain which soon became a torrent. More like the thunderstorms I've experienced on mainland Europe rather than here in the UK. My tools were soon wet as I cleared them away and yes, I was soon soaked right through all my layers of clothing with my trousers dripping as I walked inside.

Rain stopped play ... and then some. I enjoyed the shower though ... ;)
 
#24 ·
I don't know the exact ins and outs but I've been told that the original style elastomer gasket is the best to use on the K turbos? Apparently something to do with pressure? I'm not 100% sure. I know my ZT turbo has been replaced with the elastomer style one when it had the engine rebuilt at 50k-ish.
 
#25 ·
Yes, I am aware that many folks prefer to use the Elastomer CHG instead of the MLS CHG. I had a close look at the damaged areas of the Elastomer CHG I removed. The evidence of the damage showed and confirmed why there was only coolant into the oil and not the other way around. The Elastomer seals had only been destroyed in the areas around the Oil Drain Ports allowing coolant into them to drain down into the sump. There was twice the volume of "Lubricant" drained from this engine as an earlier picture in this thread shows. My careful checking of all four of the Fire Rings showed no evidence of damage there. So, no over pressurising of the coolant system as is often the case with Fire ring issues. No evidence of any oil in the radiator or any part of the cooling system I checked. Even when the old Water Pump was removed, the remaining drops of coolant trapped behind that were crystal clear. By the way Bienet1 ~ I did check there was no Thermostat ...... in the Thermostat housing. :lol:

So, as every CHG on these K Series and a few T-Turbos I have fitted were MLS ( Multi-Layer-Steel ) and so far, no come backs, that's my choice again. If that proves a wrong choice, redoing the work using an Elastomer will be so much easier now I know what's what and there will be no rounded flats on bolts or nuts and no broken or seized Exhaust Manifold and Turbocharger studs.

Amateur time consuming thoroughness pays dividends in so many ways. Pro-workshop haste with time and profit guns held to the head are rarely as thorough. This I have found time and again when working on problem cars the previously frustrated owner has given up on after parting with lots of the hard to come by and still has a problem car!

When looking for some stuff in my over crowded garage, I came across a 5-litre can of Diesel Fuel. Had a nice Diesel 600 once.. ;) I will use most of that to flush out this engine as I can see evidence of the Mayo mix lurking in some parts of the engine still and I dread to think what the inside of the sump looks like. That'll get it out ... that's my Meister plan anyway ..;)

Might get a lot more done if those Thunderstorms give me a miss tomorrow ... :broon: If they do not, I'll be in for a third time soaking to the skin. Unlucky for some. Sometimes I'm convinced the whole Universe is out to get me ... ;)

Damn and blast this weather. Too much rain and no doubt the water companies will pile on the cost of supply ... due to shortages necessitating hose pipe bans... just when my son and I have bought a Nilfisk power washer.

Only... :lol:
 
#27 ·
This might not necessarily be the result of a failed head gasket.
It is totally impossible to see on your picture, of course, and I see that you mention some problems around the oil ways on the gasket.

I would very carefully examine the gasket again, and make perfectly sure, that the fault can indeed be ascribed to the gasket.There is no good reason, why the gasket should fail here. No high temperatures, no high pressures and no special loads. But of course, nothing is impossible.

The problem could however be caused by a leak around a liner, a waterway not properly sealed or a crack.
None of these problems will be fixed by the fitting of a new gasket.
 
#28 ·
All perfectly possible of course but, that evidence with the damaged seals around the oil drain holes, plus the "Mayo" loaded through bolts has me convinced ... so far. However, nothing is ever a certainty with an unknown quantity which is what this MG ZT is for me.

Meantime, just back from a short shopping trip. Also, I took the Cylinder Head and Turbocharger to a one-man-band outfit who has a Unit on a local Industrial Estate to find no car in his workshop. Good. He was able to remove both broken studs immediately within a few minutes. I bunged him a tenner for his efforts. He used the very same Blow Torch I have then produced a Gizmo Tool made be Elora which had an eccentric Milled Cam which he attached to a 1/2" Socket Drive. As soon as that gizmo engaged, we could see the broken studs start to undo. Must get one of those Gizmo Tools. Saves much time and money.

It's stopped raining but everywhere is still wet. Not ideal for working under a car. Even so, if no more rain for a while .... might get something done.

Been listening to Radio5Live all morning. Boy have the media gone into overdrive with the ManU Moyes scenario. Some amusing stuff with the phone-ins... :)
 
#31 ·
Got the Turbocharger, Exhaust Manifiold and Cylinder Head all lined up for reassembly then guess what. Down came the rain. Lots of it and still raining now. Will Watch the Champions' League instead ... so there.
 
#33 ·
Had one like that. It blew away in the wind. Very windy where I live. The rain doesn't play fair either. It comes down sideways in all directions .... wind assisted.
 
#34 ·
Here's a little information which may help others faced with similar problems.

Before I had identified the in-tank Fuel Filter separation problems and rectified it so the engine started, I took compression readings on all four cylinders. They were disappointing something like this from 1 to 4:~

(1) 55psi (2) 60psi (3) 100psi and finally (4) 110psi.

Even allowing for the fact that the engine had not run for about a month, I expected better. Far from ideal readings and initially I'm thinking car may need replacement engine. Easy to jump to wrong conclusions.

Anyway, once I had rectified the Fuel Filter problems the car started immediately.

After getting the engine up to temperature using a fast idle, I switched engine off and removed all four Spark Plugs and Coil Packs. Then took a second and for good measure, third compression check reading. The four images attached were the second compression check. There was further improvement after running the engine again and taking a third set of compression readings next day.

Moral, do not take for granted that first check. Best to double or even treble check for a more reliable indication.
 

Attachments

#35 ·
Despite spots of rain in the air all day with the occasional very light brief shower, rain did not stop play for me this afternoon. Got quite a lot done and taught myself two new :idea: :idea:

See the first two images. First shows me using the stout 1mm feeler gauge across the Block-Cylinder Liner interface. If the gauge passes without stopping over the interface, then that's proof positive that the liner is flush with the block or below it. Ideally, both scenarios you do not want to discover on these engines. Better method than my "Finger Test" which has served me well over the years ... ;)

By holding the Feeler Gauge firmly on the block and sliding it towards the Cylinder Liner, if the gauge comes to a stop up against the liner then you know it is proud of the surrounding block. All four liners passed this simple liner check.

The second image shows a piece of wood across the freshly placed Cylinder Head Gasket and its Head Saver Shim. So, if as sometimes happens when trying to position the heavy Cylinder Head over the two locating dowels you lose control it is easy to damage the softer alloy surface of the head against the harder steel dowels. The wood acts as a cushion to eliminate that and allows better control to place the head over the locating dowels and then the wood can be removed and the head lowered safely.

Other images show progress and the use of wooden clothes pegs as third and fourth hands to hold that stiff and springy new Timing Belt in place whilst being fitted.

There was a bonus today. This is the very first K-Series Timing Belt I've fitted where all four CAMshaft Indexes and the Index one on the CRANKshaft Pulley all lined up 100% spot on. Not even a Millimetre 'out'. Suddenly got very cold. The dinner I had been preparing this morning was now ready to serve so it did not take much persuasion for me to pack away the tools and have a nice hot meal.

Should get nearer completion tomorrow ... weather permitting.
 

Attachments

#37 ·
Got a lot done today in the glorious sunshine. Not just on this car either. What I did do this afternoon after fitting the cylinder head yesterday was to fit the Turbocharger and Exhaust Manifold using those Allen Key Drive Manifold Studs. If only it was as easy as that. It wasn't because after fitting the five Ex-manifold bolts, I struggled to fit the Exhaust Manifold on them and align to the Turbocharger. Wasted best part of an hour trying to do that before coming to the conclusion that the new Exhaust Manifold Bolts were too long.

So removed all five and cut each down by about 15mm being careful not to cut the Allen Key Access end ... ;) Then used a very worn Flappy Disc in my Angle Grinder to prepare the cut end to ensure screwing them into the soft alloy of the cylinder head went smoothly. I used a spare nut to hold the stud in the vice and that protected the threads from the Angle Grinder whilst rounding the end. This produced a good tapered threaded 'pilot' into their threaded locations on the Cylinder Head. Undoing the Nut over the prepared end also cleaned up the threads nicely.Thus the five studs were in fact "bestoke". Then finished each prepared end off using Grade 180 wet and dry. The end result worked perfectly and was very pleasing.

The attached image shows two studs in the process of being 'prepared'. Should have done that after carefully measuring instead of trying to fit with the studs length 'as is'. I carefully measured the depth of the stud hole in the head, the size requirement of the Washer and Nut and the thickness of the Manifold and its Exhaust Gasket to give the ideal length of the stud for ease of fitting. Worked a treat so will do that in future. Would have saved over two hours time today. Using a two inch wide ( 50mm ) brush, I also "painted" the bare CAMshafts with some Diesel Fuel. This cleaned up the little areas still holding small quantities of the thick "Mayo" tucked away in the numerous nooks and crannies of the cylinder head very effectively.

Not too much on tomorrow so, without distractions can devote more time to the project. Weather permitting, could have it all back together and running by evening.
 

Attachments

#38 ·
A little more progress this morning.

Started soon after nine this morning with rain forecast and ever darker clouds approaching. Only got a few tools out because fed up with them getting soaked. Takes ages to dry them all off.

The two images attached show the engine's cylinder head assembled in place along with the Exhaust Manifold. Four of the five cut down Exhaust Manifold Studs and their Brass 17mm Nuts fitted are clearly visible. Then packed up.

Raining harder now and no sign in any direction of that changing for a while. For the umpteenth time this past six months rain stopped play ... ;)

Still mustn't complain really. I could have bought a property on the Somerset levels.
 

Attachments

#39 ·
Great thread John keep the posts coming:broon:

Really enjoying this and I think I'm learning a few new tricks,although to be honest I'm nowhere near ready to take an engine to pieces.It's great to watch someone else do it.:)