

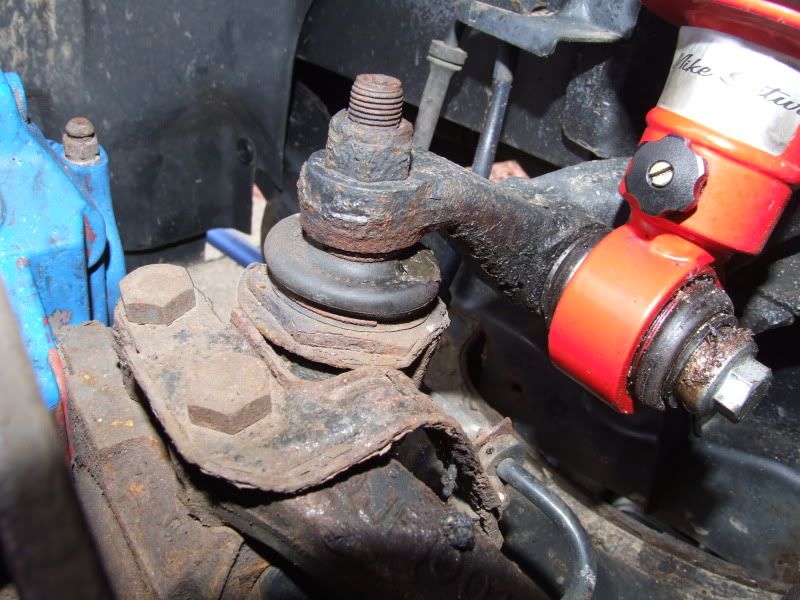
The front upper ball joint is part of the suspension and steering setup and is quite an important part in the general handling of the car.
The ball joint is screwed into the top of the hub and connected to the lower suspension arm. It allows the hub to move up and down and steer left and right.
![Image]()
Symptoms of a failed ball joint are the cars handling feels strange, such as wandering etc, a knocking noise when going over bumps etc, or in my case a loud squealing/squeaking when steering and going over bumps.
http://www.youtube.com/watch?v=IfBPpxT3JUk
One of the best ways to diagnose it is to put the car up on axle stands, remove the wheel and try and check for play and see if you can see where the clunk/squeak is coming from.
To change the ball joint you need to raise the car
![Image]()
and place on axle stands
![Image]()
remove the wheel (It is best to loosen the wheel nuts before raising the wheel off the floor.)
![Image]()
![Image]()
Clean the top threads with a wire brush or bush attachment on a drill. Try and get as much rust and dirt off as possible.
![Image]()
and add some release oil to the ball joint threads. Try not to get it on the brake components.
![Image]()
Use a jack to take the weight of the hub and compress it slightly.
![Image]()
Hammer on a 19mm spanner
![Image]()
And hammer a Torx key into the recess at the top of the bolt. It may also be an Allen key, or there may be no recess in which case you may need to cut the nut off or use a nut splitter.
![Image]()
Remove the top nut
![Image]()
Using a hammer and chisel, unfold the locking washer.
![Image]()
Now separate the suspension arm from the ball joint using a ball joint splitter. You might get away with a sharp tap of the hammer, but usually they are well seized on.
![Image]()
Now lower the hub and slide the threaded portion out of the hole in the suspension arm. You may need a bit of levering.
![Image]()
Tie the hub off with a strop or similar as the hub will swing away and pull on the flexible brake pipe.
![Image]()
Now hammer a 1 - 13/16” socket onto the ball joint. I found it easier to use my 12V impact driver to loosen the ball joint.
![Image]()
And then finish off with a ratchet driver.
![Image]()
Remove the ball joint.
![Image]()
Check that the new ball joint is the same physical size as the old one.
![Image]()
Unusually the new ball joint doesn’t have any type of key recess in the top of the bolt, unlike the old one which has a Torx recess. This will make it difficult to remove in the future and will probably need the nut to be cut off.
Clean the threads of the new ball joint
![Image]()
And add some thread lock.
![Image]()
Fit the lock washer and new joint and finger tighten.
![Image]()
Now torque the ball joint to 105Nm.
![Image]()
And hammer over the edges of the lock tab, one edge up and one edge down so that the joint cannot come free.
![Image]()
![Image]()
Now feed the bolt up through the hole in the suspension arm
![Image]()
Fit the nyloc nut and tighten to 54Nm
![Image]()
![Image]()
The job is now completed. Refit the road wheel, remove the axle stands and lower the car.
Check the car steers correctly and then take the car for a test drive to ensure everything is working properly.
The ball joint is screwed into the top of the hub and connected to the lower suspension arm. It allows the hub to move up and down and steer left and right.
Symptoms of a failed ball joint are the cars handling feels strange, such as wandering etc, a knocking noise when going over bumps etc, or in my case a loud squealing/squeaking when steering and going over bumps.
http://www.youtube.com/watch?v=IfBPpxT3JUk
One of the best ways to diagnose it is to put the car up on axle stands, remove the wheel and try and check for play and see if you can see where the clunk/squeak is coming from.
To change the ball joint you need to raise the car

and place on axle stands

remove the wheel (It is best to loosen the wheel nuts before raising the wheel off the floor.)


Clean the top threads with a wire brush or bush attachment on a drill. Try and get as much rust and dirt off as possible.

and add some release oil to the ball joint threads. Try not to get it on the brake components.

Use a jack to take the weight of the hub and compress it slightly.

Hammer on a 19mm spanner

And hammer a Torx key into the recess at the top of the bolt. It may also be an Allen key, or there may be no recess in which case you may need to cut the nut off or use a nut splitter.

Remove the top nut

Using a hammer and chisel, unfold the locking washer.

Now separate the suspension arm from the ball joint using a ball joint splitter. You might get away with a sharp tap of the hammer, but usually they are well seized on.

Now lower the hub and slide the threaded portion out of the hole in the suspension arm. You may need a bit of levering.

Tie the hub off with a strop or similar as the hub will swing away and pull on the flexible brake pipe.

Now hammer a 1 - 13/16” socket onto the ball joint. I found it easier to use my 12V impact driver to loosen the ball joint.

And then finish off with a ratchet driver.

Remove the ball joint.

Check that the new ball joint is the same physical size as the old one.

Unusually the new ball joint doesn’t have any type of key recess in the top of the bolt, unlike the old one which has a Torx recess. This will make it difficult to remove in the future and will probably need the nut to be cut off.
Clean the threads of the new ball joint

And add some thread lock.

Fit the lock washer and new joint and finger tighten.

Now torque the ball joint to 105Nm.

And hammer over the edges of the lock tab, one edge up and one edge down so that the joint cannot come free.


Now feed the bolt up through the hole in the suspension arm

Fit the nyloc nut and tighten to 54Nm


The job is now completed. Refit the road wheel, remove the axle stands and lower the car.
Check the car steers correctly and then take the car for a test drive to ensure everything is working properly.
")


